Uncategorized
Customizing Mylar Bags for Personal Cannabis Storage: A DIY Guide
Jan
Why Mylar Still Wins in 2026
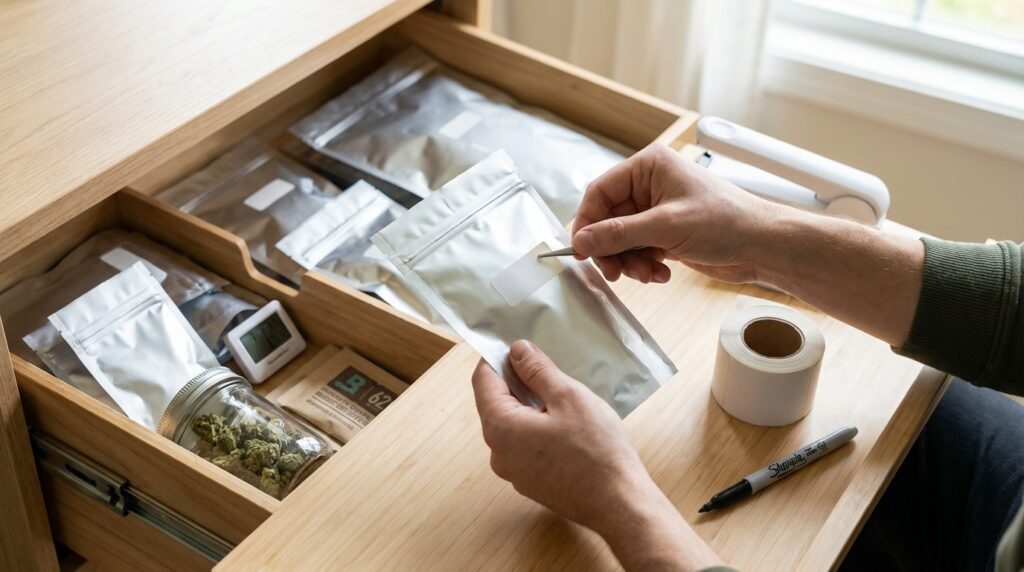
On 23 January 2026, my drawer looks like a small private apothecary. It’s not an accident. The right Mylar bag keeps flower tidy, discreet, less exposed to light.
Mylar is not a mystical material. It’s a trade name often used for BoPET film. Once laminated with aluminium layers, it blocks light, oxygen, moisture, odour. That combination is the point. See the packaging overview from The Custom Boxes.
Glass jars look charming on Instagram. They also invite UV, curiosity, fingerprints. Mylar is less romantic. It’s far more effective for day-to-day storage.
Customising the bag is the small luxury. It turns a generic pouch into something that feels considered. It also stops you opening the wrong strain at midnight.
Bag Anatomy: What You Are Actually Paying For
Most decent pouches are laminated layers. Think of it as a coat with lining. Each layer has a job.
A common stack is an outer print layer, a barrier middle, a food grade inner seal layer. One supplier summary breaks this down as surface layer, middle barrier, lining layer. It’s worth reading once. Use Marijuana Packaging Solution as a plain language reference.
Material names vary by supplier. You’ll see PET on the outside. You’ll see VMPET or foil in the middle. You’ll see PE inside for heat sealing. The Custom Boxes also list PET, aluminium foil, LLDPE as common components. Use their guide as a quick checklist. Source here.
Thickness matters more than people admit. A thin pouch creases fast. A thicker pouch feels premium. Beiyin’s guide gives a useful conversion. 3.5 mil is about 89 μm. 4.5 mil is about 114 μm. 5.0 mil is about 127 μm. See Beiyin’s thickness section.
| Spec you will see | What it changes | My preference for personal storage |
|---|---|---|
| Outer finish | Scuffs, fingerprints, overall look | Matte black or matte white. Gloss looks cheap fast. |
| Barrier layer | Odour control, moisture stability, light protection | VMPET or foil middle. Opaque when possible. |
| Thickness | Feel, puncture resistance, crease marks | 114 μm as a sensible middle ground. |
| Closure | Daily use, safety in homes with children | Zip plus heat seal top. Child resistant zip if needed. |
Size, Shape, and the Quiet Pleasure of Organisation
Buying the wrong size is the classic mistake. Too small crushes flower. Too big leaves excess air. Both ruin the neatness.
For personal storage, I like a simple rule. Use a pouch that looks half full once packed. It reduces headspace. It also stops brittle nugs turning to dust.
Bag styles are not just for brands. Stand up pouches sit neatly in a drawer organiser. Flat pouches stack in a travel case. Zip closures suit anything you open more than once. The Custom Boxes list stand up pouches, flat pouches, gusseted bags, ziplock formats, child resistant bags. Their types section is useful.
| Typical use | Common pouch size | What it comfortably holds |
|---|---|---|
| Small daily rotation | 100 mm x 150 mm stand up pouch | 3.5 g to 7 g depending on density |
| Weekend stash | 130 mm x 200 mm stand up pouch | 7 g to 14 g |
| Bulk home storage | 160 mm x 240 mm stand up pouch | 28 g with room for a humidity pack |
| Pre rolls | Single stick slim pouch | One or two pre rolls. Less crush risk. |
Windows look tempting. They also leak light. If you want a window, keep it small. Place it low. Beiyin’s guide calls out windows, tear notches, hang holes, zippers as functional constraints for design. See their add-ons notes.
Design Notes From Mayfair: Keep It Discreet
Most DIY weed packaging looks like a corner shop energy drink. Loud gradients. Clip art leaves. Fonts that scream.
Do the opposite. Go quiet. Think pharmacy label meets a private members club. One strong typeface. One accent colour. Plenty of breathing space.
In January 2026, minimal labels are everywhere across London beauty counters. The same logic works here. Matte finishes read expensive. Soft touch reads even better. If you can’t print soft touch, mimic it with a matte overlaminate.
Use a naming system that feels adult. “Gelato” is fine. “Alien Frost Mega Candy” reads like a novelty vape. Your future self will thank you.
What to put on your label
Keep it factual. Use details you’ll actually use. Avoid anything that feels like a marketing claim.
- Strain name plus phenotype note
- Pack date in full, like 23 January 2026
- Target RH like 58% or 62%
- Short note, “night” or “day”
If you need a design tool, use Adobe Illustrator if you know it. Canva also works for clean label layouts. Grateful Stoner even name checks both. Their design software note is here.
DIY Method One: Labels That Pass for Factory Work
This is the best route for most people. It’s controlled. It’s repeatable. It looks tidy if you choose the right materials.
Buy plain pouches in a consistent finish. Choose matte black or matte white. Wipe the front with isopropyl alcohol. Let it dry fully. Then apply your label.
Use vinyl labels if you can. Paper labels scuff fast. Add a clear matte overlaminate film if you want a more finished look. It also stops ink rubbing off in a pocket.
Silver Edge list the basic kit for DIY bags. Food grade Mylar bags, scissors, marker, labels. They also mention sealing with an iron if you lack a sealer. Use their materials list as a baseline.
A practical label workflow
Print on A4 vinyl label sheets using a decent laser printer. Inkjet can work. It smears more easily without lamination. Cut with a metal ruler plus craft knife if you care about edges.
Apply from the centre outward. Use a bank card to burnish the label. Pay attention to the zipper curve. Labels lift there first.
Keep a master template. Duplicate it for each strain. Save as a PDF. You’ll reuse it for months.
DIY Method Two: Stencil, Screen, and Foil Details
Direct print looks better than a sticker. It also takes patience. Expect a few failed pouches.
Start with a stencil cut on a Cricut style cutter. Use permanent vinyl for the stencil. Apply it to the pouch front. Burnish hard. Any gaps will bleed ink.
Use a screen printing ink made for plastics. Work in good ventilation. Let it cure fully. If you touch it too early, you’ll ruin the finish. Grateful Stoner mention screen printing as a common method. See their printing methods section.
Foil is the temptation. Gold looks chic for five minutes. Then it looks like a stag do. If you must, use a small foil monogram. Keep it to one corner.
Small details that read expensive
Use one ink colour. Use one spot graphic. A simple crest works. A small batch number works. A thin border works if your cutting is clean.
Beiyin warn that the tear off area above the zipper disappears. Place anything important below the tear line. Their zipper guidance is worth copying.
DIY Method Three: Cutting and Heat Sealing Your Own Pouches
This method is for odd sizes. It’s also for people who want a flatter pouch for travel. It feels slightly obsessive. I respect that.
Silver Edge suggest two sealing options. Use an impulse heat sealer. Use a household iron with parchment paper. They even suggest a double seal for extra protection. Their heat sealing steps are clear.
Cut your Mylar sheet to size. Leave extra material for a top seal. Aim for at least 10 mm of seal width. Narrow seals fail first.
Do a test seal on scrap. Pull it apart once cool. If it peels cleanly, your heat is too low. If it warps, your heat is too high.
A simple home routine
Fill the pouch. Push out excess air without crushing the contents. Add your humidity pack if you use one. Then seal.
- Impulse sealer for consistency
- Parchment paper if using an iron
- Scissors reserved for clean cuts
- Small tray to catch stray flower
Label after sealing. That way, your hands stay clean. It also avoids fingerprints trapped under clear laminate.
Sealing, Storage, Costings, and Mistakes I See Weekly
A zip closure is not enough for long storage. Heat seal above the zip for anything you won’t open daily. It adds tamper evidence. It also slows aroma loss.
Humidity control is not a myth. For flower, most people sit comfortably at 58% RH or 62% RH. Use one 8 g humidity pack for up to 28 g of flower. Replace packs when they go stiff.
Store bags in a cool dark place. Avoid window sills. Avoid cars. Keep temperatures steady if you can. Aim for roughly 16°C to 20°C. Heat swings degrade terpenes fast.
UK note. Recreational cannabis remains illegal in the UK at the moment. If your cannabis is authorised for medical use, keep it stored securely. Keep original pharmacy labels for travel.
DIY costings I would budget in 2026
| Item | Typical price in the UK | Comment |
|---|---|---|
| Pack of 100 blank matte pouches | £12 to £22 | Choose thicker film if you hate creases. |
| Impulse heat sealer | £25 to £60 | Buy once. Stop using the iron. |
| Vinyl label sheets plus laminate | £18 to £35 | This is the upgrade that changes the look. |
| Humidity packs for a month of rotation | £10 to £20 | Depends on how many strains you keep open. |
If you wonder why brands don’t print “properly” at small quantities, this is why. Custom printing has set up costs. Some suppliers say pricing improves once you order above 30,000 pieces per size and design. That’s not personal use territory. See their cost discussion.
The mistakes
- Overfilling the pouch
- Placing the logo above the tear line
- Using glossy labels on a matte bag
- Storing near a radiator
If you want extra background reading, start with The Custom Boxes for formats. Use Silver Edge for basic sealing steps. Use Grateful Stoner for printing method options.
A neat stash is not flashy. It’s simply well chosen materials plus quiet design. That’s the whole trick.